Install Rancher
Rancher is an orchestration system for kubernetes. It provides a UI on top of whichever installation of kubernetes you have & gives you a unified way to make changes and see what you have running.
Create namespaces
We’ll create a few namespaces to organize kubernetes. We’ll use these over the upcoming steps to keep everything tidy.
kubectl create ns cert-manager
kubectl create ns cattle-system
 CHECKPOINT
Take a moment to revel in the glory of your organization with kubectl get ns to see the spaces you’ve setup. You’ll see several system-generated namespaces in there along with the ones you’ve created.
Install Helm
curl https://raw.githubusercontent.com/helm/helm/master/scripts/get-helm-3 | bash
Helm is a widely used package manager for Kubernetes. It uses the term ‘charts’ for packages. It’s corny, but fun. Feel free to add on to the mood with your own nautical reference or exclamation at any point.
Update Helm Repo
We need to update helm so it knows about a couple of packages we’ll install. Then tell Helm to update.
helm repo add jetstack https://charts.jetstack.io
helm repo add rancher-latest https://releases.rancher.com/server-charts/latest
helm repo update
- repo add tells helm to add the following repositories (repos).
- The following name is a name we assign to refer to the repository (repo) later.
- The URL tells Helm where to download.
- repo update tells Helm to go to his room and think about why he didn’t come pre-loaded with such critical charts. And then when it’s ready, to come back downstairs and tell his sister that he’s sorry for wasting his her time making her run these commands over and over again.
![]() You can run
You can run helm repo list to see all of applications helm currently knows about.
Install cert-manager
helm install \
cert-manager jetstack/cert-manager \
--namespace cert-manager \
--create-namespace \
--version v1.3.1 \
--set installCRDs=true
- We tell helm to install followed by a repo name.
- Then we specify which ‘chart’ we want to use from the repo. One repository can store many charts.
- namespace tells Helm to add this to the cert-manager namespace.
- version allows us to specify a specific chart version.
- set specifies additional options for Helm to process (not always needed).
 CHECKPOINT
Confirm it worked.
kubectl get pods -n cert-manager
It was succesful if you see running status for 3 pods.
- You’ve deployed your first pod! Great! Pods are discrete, deployable ‘units’. They can run alone or deployed as a group. All of them sharing storage… network resources… life goals… and ambitions for success.
- It might take a bit for Helm to deploy everything. Hang tight and run the cmd above until you see results.
- If you see an error message or if your computer spontaneously catches fire… there is a tiny chance something went wrong. SuchCodeWow and its affiliates are not responsible for any damage to computer equipment, personal property, or household pets both domestic & exotic
![]() It makes a lot of sense to think dropping the namespace part (-n xx) from the command would be a quick way to simply show all pods. If you are thinking that- You’re awesome! You can make good inferences and employee logic effectively. Too bad you’re completely and utterly wrong. Kubernetes doesn’t have time for logic or making any sense. You have to use
It makes a lot of sense to think dropping the namespace part (-n xx) from the command would be a quick way to simply show all pods. If you are thinking that- You’re awesome! You can make good inferences and employee logic effectively. Too bad you’re completely and utterly wrong. Kubernetes doesn’t have time for logic or making any sense. You have to use kubectl get pods -A to show everything. Don’t worry if you miss the -A and it suddenly looks like all of your hard work so far disappeared!
Install Rancher ( yeehaw! )
If you were feeling rebellious earlier and used a different DNS name in the hosts file during step 1 remember to replace the default value after hostname= shown here.
helm install rancher rancher-latest/rancher \
--set ingress.tls.source=rancher \
--namespace cattle-system \
--set hostname=rancher.localdev
- Setting the hostname parameter gives rancher a home address.
 CHECKPOINT
You can watch the deployment of Rancher with this command.
kubectl get deploy -A
In the results list, you should see rancher in your cattle-system namespace. If you run the command a few times eventually you should see 3/3 under ready.
- The get command displays resources for a given name or namespace.
- Resources are collections of objects. They can be running workloads (pods) or less tangible objects like this deploy activity. Kubernetes has lots. Applying configurations can add more. Run
kubectl api-resourcesif you enjoy watching enormous lists scroll by on your screen.
You can also check the status of the deploy rancher activity directly.
kubectl -n cattle-system rollout status deploy/rancher
Look for deployment “rancher” successfully rolled out. Hang tight moving forward until it’s finished.
Check that the ingress has been setup.
kubectl -n cattle-system get ingresses
- ingress is a term for an external route into your kubernetes environment. An ingress can handle any number of routing rules and distribute traffic for any number of application types.
- Different kubernetes distributions use different default ingresses. For example, traefik for k3s and nginx for microk8s. Other options exist as well as offerings from cloud providers. More info on using an ingress here.
 CHECKPOINT
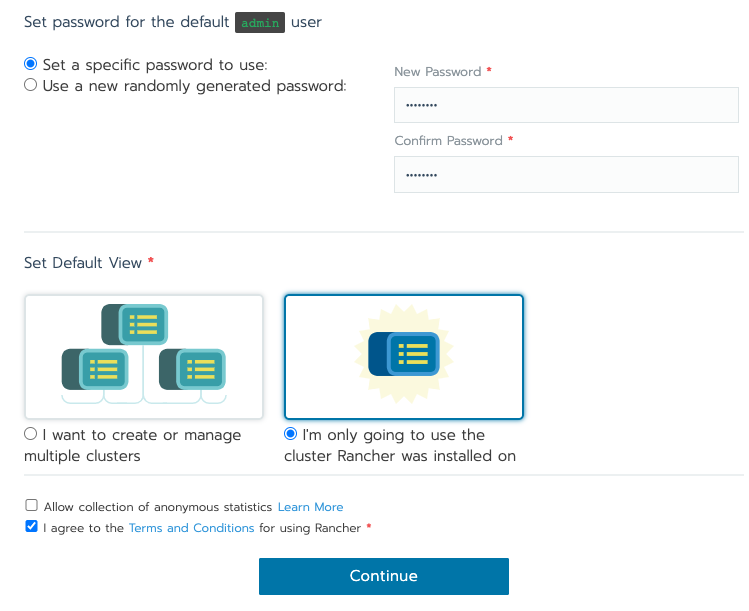
Navigate to http://rancher.localdev in your browser. Pick an admin password and, for simplicity, you can check the box on the right indicating this will be the only cluster managed.

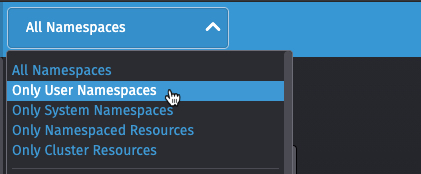
Your cluster dashboard should reflect a graphic view of what we’ve built today. You can click on any of the boxes to see what’s running. You may need to find the namespaces option at the top and change your scope.

Next Steps
If you have rancher running & can view the objects in your environment- that’s awesome! You’re doing an outstanding job. You’ve got a real, usable kubernetes system running that you built YOURSELF!
Cut out the star below, pin it to your shirt, and check out how easily Dynatrace can be added to your environment to provide unparalleled monitoring and observability in step 4.
